
How to Improve Your Seascape Pictures
- Daniel Wretham

- Nov 4, 2016
- 11 min read
Updated: Aug 19, 2022
Hello again and thanks for checking out my blog. If you're here you've probably found it by chance or your one of the loyal readers who come back every week and who can't be thanked enough for supporting me :)
So this week its all about that photographers favourite, the seascape.
So what is a seascape ? Why are they so loved by photographers ? What can you do to improve yours ?
All questions I hope to be able to give you some help with.
So what is a seascape then ? Well, it's essentially just a landscape shot with the sea as the dominant focus right ? Well, yes and no.
Seascapes come in many different styles and just cause you shoot a shot with sea in it, it doesn't necessarily mean it's a seascape.
To me a seascape is something that focuses heavily on this area, It's a chance to get very creative with your photography because your not shooting a static item. The movement the sea provides is priceless and can make pictures come to life because the sea structure is telling the story, be it a dramatic wave hitting the cliffs or a dreamy long exposure that flattens everything out and makes it look like another planet.
The possibilities are endless and the results are dramatic and different every time so the scene constantly has new life breathed into it.
Then of course theres the wonders that are revealed at low tide, then the drama of angry weather, in short the seascape offers constant new possibilities and many ways to shoot, couple that with the basics of light and sunsets and sunrises and the possibilities really are endless.
I have taken many pictures of the same scene before but keep them due to the sea condition at the time (as well as the light) giving new looks and feels to the overall scene.
So what can you do with a seascape then to make it different ? Well, lets take a look at three ways you can shoot the same scene but with very different results.
The three ways I'm going to talk about would be the fast shutter speed, sharp shots, the semi long exposure and of course the seascape favourite the long exposure.
The Freeze Frame Shots
So why take a freeze frame fast exposure ? Well, it can really show the drama of a situation and it will give you much more detail in a shot. These are great for bad weather when you have huge waves battering the coastline, These dramatic shots are of course the most dangerous and should be taken with caution. No picture no matter how good is worth your life. The sea is a dangerous mistress and she deserves to be treated with your utmost respect and never ever turn your back on her as she will take you out in a heart beat.
Believe me I speak from experience and I'm lucky to be here today.
When the sea is this rough most people tend not to shoot but they're missing a great moment, get rid of your trusted wide angle lens at this point and reach for some longer glass. Typically I like to use my Canon 70-200mm F4 lens here as it keeps me far enough out of harms way (also out of the dreaded seas spray which will ruin pictures no matter how many times you clean your lens) but also gives a lovely sharp and clean result.

I shot this image a couple of years ago during the Valentines Day storms, As you can see it wasn't a day to stand down on the ledges trying to shoot.
I sat for a long time watching the behaviour of the water and how it would leap up over the ledges and catch out passers by who had got too close.
I noticed that the sun light was shining perfectly on the ledge and that when a wave hit it lit up the water perfectly and gave it a lovely golden tone. Could I have got this shot if I had gone closer with my wide angel ? Possibly, but it would have been unsafe to do so and would have presented me with the sea spray problem. Long glass was used and from memory an aperture of F8 and ISO of 200 to nicely freeze the action but to still give me a good enough quality image to enlarge.
I could have shot this at a much higher ISO and frozen the action much more and been sharper but the quality would have suffered so I felt this was the way to go.
Next time its windy and the sea is kicking up, give it a go ! This remains one of my favourite pictures I have shot purely because of the memory of being there and seeing Portland get absolutely battered although I will never ever forgive it for taking out Pom Pom rock stack which had stood proud for millions of years.
The Long Exposure Shot
Well, I feel these need no introduction really as they are so loved by photographers and non photographers alike but I will go into a little detail for those of you that haven't tried it yet.
A long exposure picture is generally one that isn't a simple snap, it may last a mere second (although i'd call that a semi long exposure) or it may go over hours in very rare cases.
A good long exposure shot around sunset time will typically be taken over ten minutes or so.
Why take one ? Well, it flattens out the water, it drags the clouds along and it adds movement to the scene, and to top it off it looks dam cool ! Not to mention the fact that your friends jaws will drop as they can't understand how you have done it ! Get ready for shouts of "it's a photoshop from the uneducated masses"
How do you make it a long exposure ? Well, there are several ways, in low light conditions your exposure time will naturally increase as the camera tries to gather as much light as possible.
Can you help the process along ? Absolutely, you can lower your ISO to its lowest setting (100 on most cameras although newer models and pro cameras will generally have an expanded ISO setting where you can drag it right down to ISO 50 although this isn't an officially recognised ISO hence some manufactures will call it something different. ISO L in Canons case) This will not only improve the quality of the grain in the shot but it will also add time to your exposure. You can also shoot with the narrowest aperture you can (on most lens roughly around F22) this will increase time and also get front to back sharpness on your shot but it does come at a price. Some lens will suffer refraction when shooting at such F stops, in my mind a good compromise is not to go above F16 where possible in order to get the best from your lens.
So now your armed with F16 at ISO 100 and the light is low and not too bright you should be seeing slightly longer exposure times so a tripod is needed and a shutter release or timer shot to eliminate camera shake. Hand held shots are totally not feasible for this type of shot.
There is however an easier way, The ND or Neutral Density filter. What is this cunning piece of devilry I hear you ask, well I have done an entire blog on these bad boys which you can read by clicking HERE.
But a quick explanation is that it's a small filter that goes in front of your lens and its dark, very very dark ! They can be made of glass or resin and some of the very best on the market are available from Lee Filters.
Those who know me know I won't shoot with any other brand of ND filters as I rate them so highly.
They are available in several densities, 6 stops, 10 stops and a whopping great big 15 stops !
I use the little stopper (6 stops) and the big stopper (10 stops) for most of my long exposure shots. There are other manufactures which do good ones but I find the Lee Filters versions are the best for eliminating colour casts and increasing the optical quality. Why have a fantastic super good quality lens and then cover it with some sub par filter ? They are not cheap but the best never is.
These will enable you to slow down the exposure by a serious amount, were talking minutes here not seconds.
You will have more control in the aperture you use and the ISO quality too as the filter is doing all the time delay for you so they are well worth purchasing.

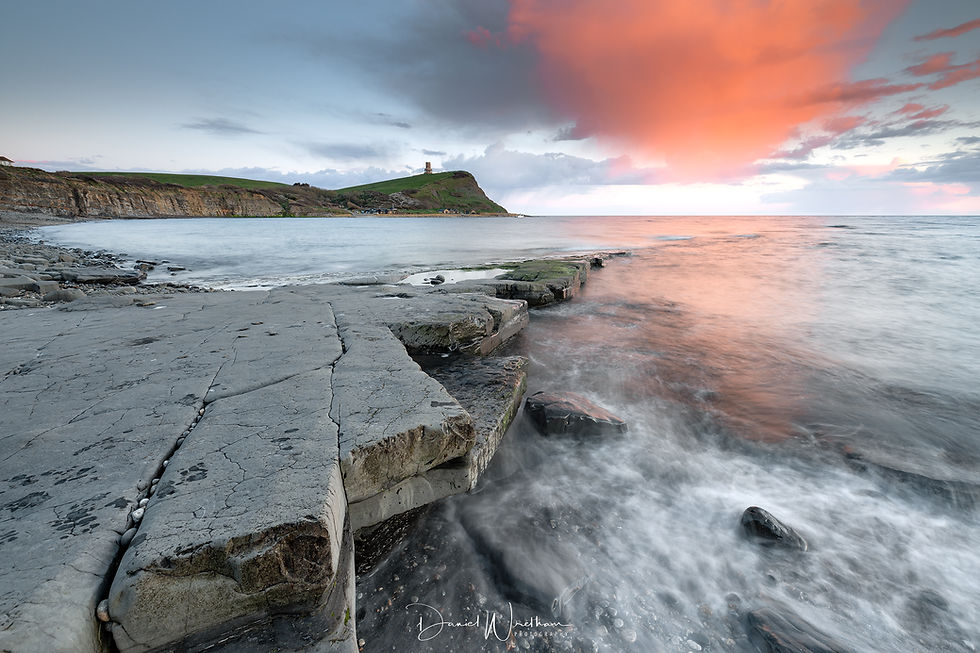
This is a typical long exposure on a calm day, Lots of cloud movement but the sea is flattened out and not so milky as a choppy sea.

The above image is a long exposure with a more choppy sea and it gives it that more milky effect.
Long exposures with an ND filter are in reality the best way forward and well worth using an ND Graduated filter too to balance the sky and help increase your exposure time.
Another point worth mentioning is try and pick a composition where the sky is either drifting away or towards you to increase the effect, if its going from left to right or vice versa it doesn't have the same effect, more of just a blurring effect. It's also better to do this type of shot when its not thick cloud, separation is king here.
Another tip which is essential when shooting a long exposure, cover up your view finder window on the camera to stop light leaking in and causing problems on your exposure. If you have ever noticed a big line down one side of your picture, this is probably the culprit.
A small piece of black top across it will seal it off nicely and keep your camera light leak free ;)
So we've covered a bit about freezing an image and also long exposures so whats in between.
The Semi Long Exposure
This just happens to be my favourite and in my opinion the absolute best for getting creative with your shots and setting yourself apart from the pack who just do long exposures.
The bonus of water is it's unique movement and you can add this to your image and make them really come to life.
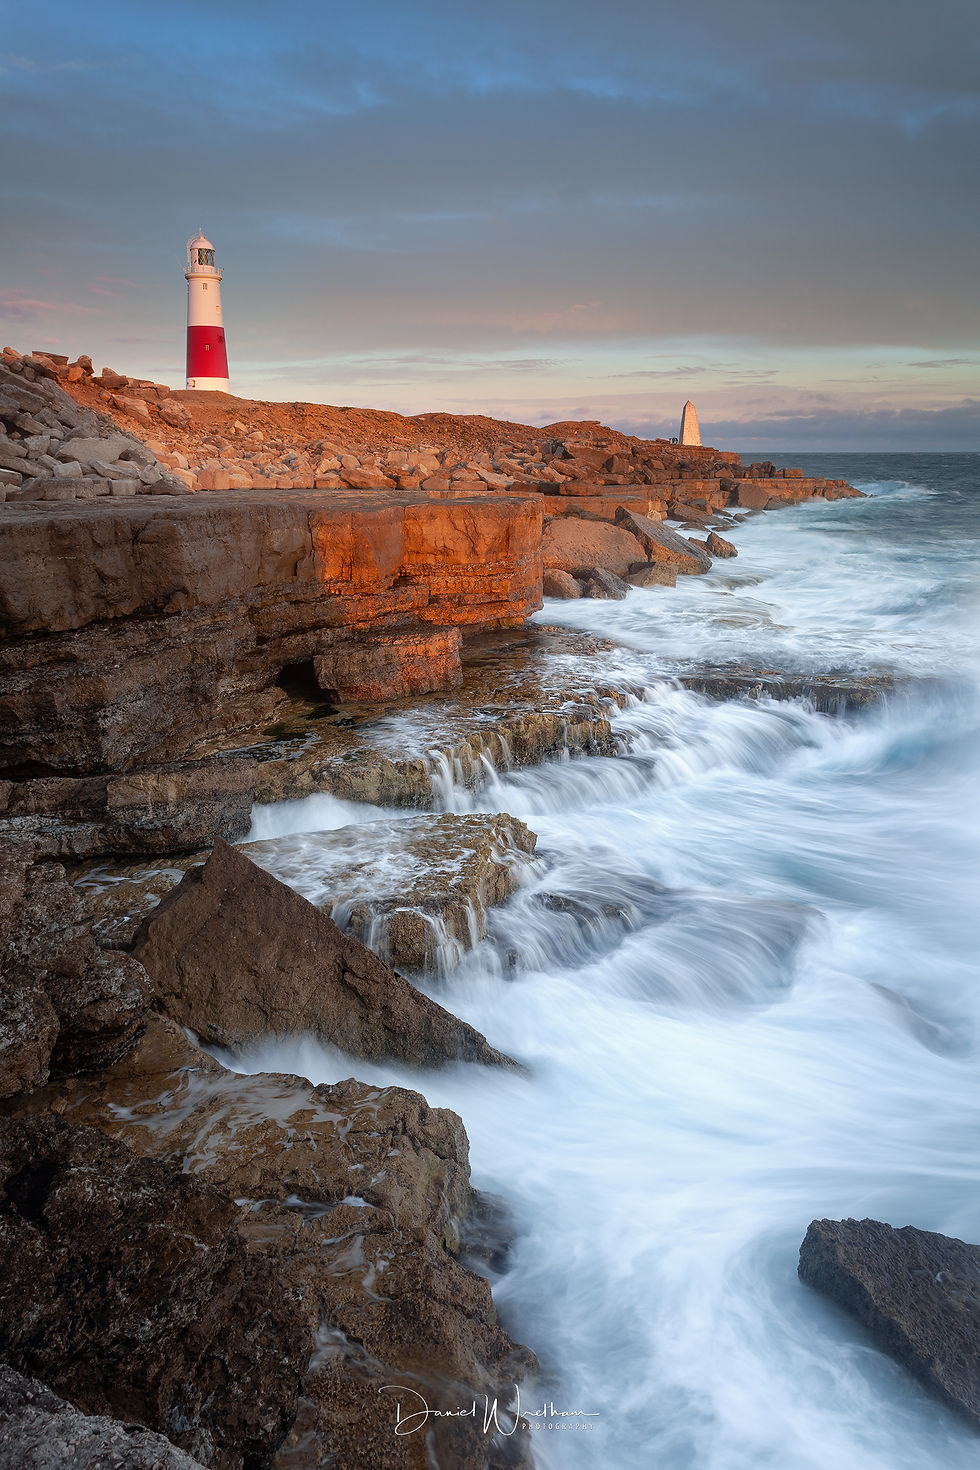
The principal of how you take it is very much along the lines of the first method we discussed in the long exposure technique above. But you are looking for a shutter speed of around half a second or so depending on the speed of the wave you are trying to capture or up to around 4 seconds if the wave is receding back and you want to catch the movement.
At this point i'll put a couple of images up so you get the general idea.

The above shot was taken at F16 ISO 50 for 3.2 seconds as the wave receded back down the shore.

This shot required a faster speed to capture the run off on the second rock so it was take an F8 ISO 100 and for half a second shutter speed.

The above image was taken at F16 and ISO 50 with an shutter speed of 1.6 seconds to get the motion
Finally this shot was taken at F8 ISO 50 for 0.6 seconds to get the run off but also the movement suggestion of the stormy water below.
With these examples hopefully you will see what I mean in terms of water motion but not too much, and I hope too you will agree that they make for a better picture than the full blown long exposures (although they absolutely have their place and use).
These type of pictures can be taken without the use of an ND filter so they are a good place to start without it having to cost you anything extra (as long as you have a tripod already)
So these are the basic three type of shots to have in your arsenal when getting ready to tackle a seascape.
Once the technique is learnt you will be an unstoppable camera warrior ready to tackle anything and also be able to apply these techniques to other areas of photography so get out there and practice but once again, be wary of the sea as it can be a dangerous place.
So what should you look for out of a seascape ? Well, it's a subjective one really isn't it cause each person will put their own individual stamp on it and do their own style unless of course your one of those terrible "photographers" who just copy other peoples shots :/ shame on you !
Develop your style around the following elements (not in any order).
1. Sea (well obviously)
2. Foreground
3. Light
4. Horizon interest
5. Motion
So the first one, Sea ! Well, of course you need sea for a seascape, this should be your main focus and also ties in nicely with point 5.
If you just shoot a plain sea and a plain horizon though it's not going to be a very dynamic image although the minimalists out there may give you a pat on the back ?!
Combining it with the other points will dramatically improve your seascapes, Foreground interest applies right the way through the photography range really and its essential. Look for naturally leading lines to draw someone into the picture, rocks and ledges with light bouncing off them pouring into the image pull you in and they look great with waves crashing over them.
Shoot when the light is right, long exposures need more light for the obvious reason but it can also be their undoing, Direct sunlight on a bright sea can kill your pictures so look to shoot what is being lit by the light rather than just directly into it (although this can work well if done correctly).
Look for detail in the horizon, something of interest too let the viewer of the picture follow right in, maybe a cliff edge, a tower or even a ship for example.
The horizon interest is the least important in my opinion and if I had a shot that had really strong foreground and good light then I would sacrifice the lack of horizon detail to get the other bits, but i'd look for a way to include it if I could.
So how else can you improve your seascapes ? Well, it's an obvious statement but choose your location wisely.
If you go to a sandy beach with no features around the best you can really hope to catch is some nice movement in the water as it runs back to the sea and a bit of cloud, but it's not very interesting is it ?
Try and find venues that are full of big rocks and features like cliffs, ledges and know your tide times.
High tide at one venue may look very bland and boring but at low tide it may reveal a wealth of features to go at and thus transform it.
Study the weather and the clouds and see how they are moving, is there a dramatic weather system moving along the coast, can you get in front or behind it and include it in your picture.
Look for texture in your foreground, wet pebbles with sunlight bouncing off them can add layers and layers of interest and colour.

Large weather systems moving over the sea can add dramatic feel to your images
Get low, it never seems to amaze me just how many photographers who set up their tripod in the highest position it will go and shoot at eye level all the time. By getting low you get closer to your subject, you bring it into the picture as a point of focus and detail, you use it to emphasis the scene. It's not a hard and fast rule but if you don't do it, try it once or twice and see the difference it makes to your usual shots.
Likewise if you always shoot low then try the other, mix it up.
Take a pair of wellington boots with you, it will give you access to areas you couldn't normally shoot, I'm ashamed to say this one only dawned on me fairly recently when a friend brought his and ended up getting some fantastic shots of an inaccessible area to me in my walking boots while all I could do was look on in envy wishing I had done the same ! I now take mine everywhere just in case and it has scored me many bonus shots and the all important different new angles ;)
I mentioned it earlier but stability is king with this type of shot, you simply can't beat the sharpness you will achieve with a good heavy tripod and a cable release, don't under estimate the importance of this during long exposures. The slightest of movement will kill a shot and this is amplified when using a telephoto lens at any range.
No point in having all the best gear available and then using a wobbly tripod and getting soft, blurred images but I see so many people do just this and put them out.
It's the foundation of your shot, everything rests on it, literally.
I really would like to go much deeper with this subject but alas I have run out of time and the bills don't pay themselves so I need to call time on it.
I hope this has helped you in some small way and has given you some ideas to try out, i'd love to see your results so please feel fee to contact me and show me how you have got on.
As always thanks so much for reading and sharing, Happy shooting.
Daniel Wretham


